
smartmontools: How S.M.A.R.T. Monitoring Your SSD or HDD Will Keep Your Data Safe
Ensuring data security is of utmost importance. One powerful tool that can help in this endeavor is S.M.A.R.T. monitoring, which provides valuable insights into the health of your SSD and HDD drives. This article explores the installation process of smartmontools on different Linux versions and FreeBSD, as well as how to check disk 🖴 health, set up email monitoring, and test drives using smartmontools. Additionally, we delve into alternative software options for Linux systems and address the possibility of fixing or resetting S.M.A.R.T. data on failing drives. Lastly, we touch upon testing S.M.A.R.T. on HDD or SSD drives using Windows.
Table of Contents
- Installing Smartmontools on Different Linux Versions and FreeBSD
- How to Check Disk Health with Smartmontools
- GUI for Smartmontools: A User-Friendly Approach
- Smartmontools Email Monitoring: Stay Updated on Your Disk Health
- Testing HDD or SSD Drive with Smartmontools on Linux
- S.M.A.R.T Monitoring – Other Software for Linux Systems
- Can I Fix or Reset the S.M.A.R.T Data of a Failing Drive?
- Testing S.M.A.R.T of HDD or SSD on a Windows System
- How Monitoring Your SSD or HDD with S.M.A.R.T Keeps Your Data Safe
- Conclusion: The Importance of S.M.A.R.T Monitoring for Data Safety
Installing Smartmontools on Different Linux Versions and FreeBSD
Smartmontools is a useful utility for monitoring and analyzing the health of hard drives 🖴 and solid-state drives (SSDs). Installing it on various Linux distributions and FreeBSD is straightforward.
On Debian-based systems like Ubuntu, use the following command to install Smartmontools:
sudo apt-get install smartmontools
For Red Hat-based distributions such as CentOS, Fedora, or RHEL, use:
sudo yum install smartmontools
On Arch Linux, use:
sudo pacman -S smartmontools
For FreeBSD, install Smartmontools using the package manager:
cd /usr/ports/sysutils/smartmontools
make install clean
Then Run the following pkg command (only FreeBSD)
pkg install smartmontools
How to Check Disk 🖴 Health with Smartmontools
Identify the disk: Determine the device name of the disk you want to check. You can use the lsblk command to list all available disks and their corresponding device names.
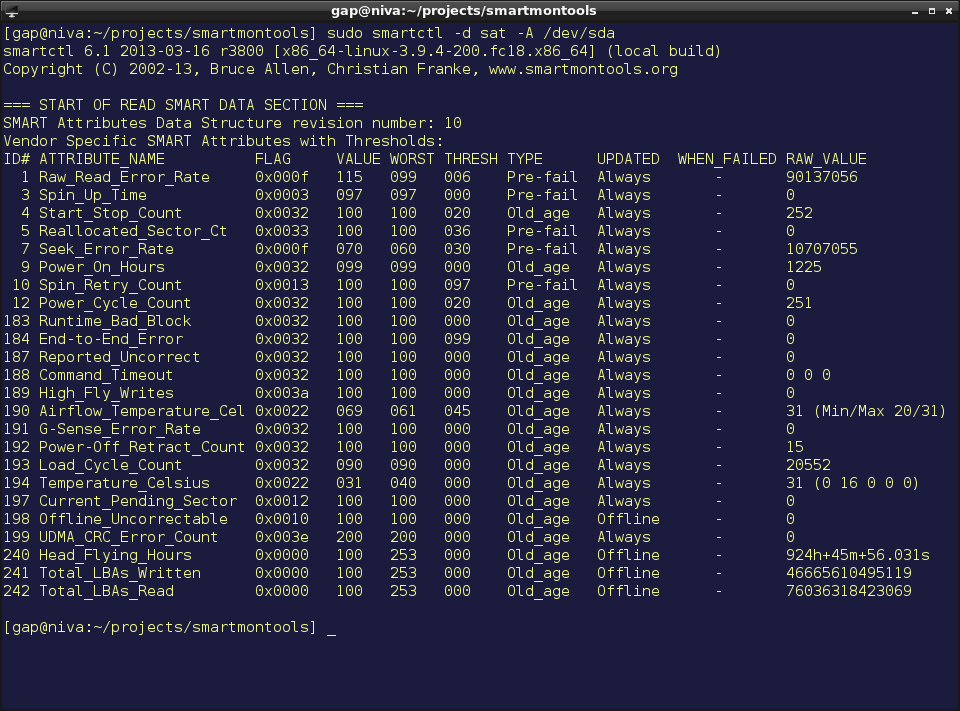
3. Run the health check: Use the smartctl command with the appropriate options and the device name to check the disk’s health. For example, to check the health of the disk at /dev/sda, run:
sudo smartctl -H /dev/sda
To view addifional S.M.A.R.T info, run (in case when we have NVMe drive, not SATA one) sudo smartctl --all /dev/nvme0n1
smartctl --all /dev/nvme0n1

smartctl 7.0 2018-12-30 r4883 [x86_64-linux-3.10.0-1160.el7.x86_64] (local build)

Copyright (C) 2002-18, Bruce Allen, Christian Franke, www.smartmontools.org
S.M.A.R.T data of a good condition NVMe drive example
=== START OF INFORMATION SECTION ===

Model Number: SAMSUNG MZWLL6T4HMLA-00005

Serial Number: S4A90245620028

Firmware Version: GPJA2B3Q

PCI Vendor/Subsystem ID: 0x144d

IEEE OUI Identifier: 0x002538

Total NVM Capacity: 6,401,252,745,216 [6.40 TB]

Unallocated NVM Capacity: 0

Controller ID: 33

Number of Namespaces: 32

Namespace 1 Size/Capacity: 6,401,252,745,216 [6.40 TB]

Namespace 1 Formatted LBA Size: 512

Local Time is: Thu Jan 18 15:56:38 2024 EET

Firmware Updates (0x17): 3 Slots, Slot 1 R/O, no Reset required

Optional Admin Commands (0x000e): Format Frmw_DL NS_Mngmt

Optional NVM Commands (0x003e): Wr_Unc DS_Mngmt Wr_Zero Sav/Sel_Feat Resv

Maximum Data Transfer Size: 32 Pages

Warning Comp. Temp. Threshold: 77 Celsius

Critical Comp. Temp. Threshold: 84 Celsius
Supported Power States

St Op Max Active Idle RL RT WL WT Ent_Lat Ex_Lat

0 + 25.00W - - 0 0 0 0 100 100
Supported LBA Sizes (NSID 0x1)

Id Fmt Data Metadt Rel_Perf

0 - 512 0 1

1 - 512 8 3

2 - 4096 0 0

3 - 4096 8 2
=== START OF SMART DATA SECTION ===

SMART overall-health self-assessment test result: PASSED
SMART/Health Information (NVMe Log 0x02)

Critical Warning: 0x00

Temperature: 44 Celsius

Available Spare: 100%

Available Spare Threshold: 10%

Percentage Used: 0%

Data Units Read: 33,213,902 [17.0 TB]

Data Units Written: 205,985,406 [105 TB]

Host Read Commands: 158,695,288

Host Write Commands: 912,954,254

Controller Busy Time: 804

Power Cycles: 38

Power On Hours: 2,806

Unsafe Shutdowns: 31

Media and Data Integrity Errors: 0

Error Information Log Entries: 0

Warning Comp. Temperature Time: 0

Critical Comp. Temperature Time: 0

Temperature Sensor 1: 44 Celsius

Temperature Sensor 2: 44 Celsius

Temperature Sensor 3: 38 Celsius
Error Information (NVMe Log 0x01, max 256 entries)

No Errors Logged
4. Interpret the results: Smartmontools will provide a detailed report on the disk’s health status. Look for keywords like “PASSED” or “FAILED” to determine the overall health of the disk.
Regularly checking disk health with Smartmontools can help identify potential issues early on, allowing you to take necessary actions to prevent data loss or disk failure.
GUI for Smartmontools: A User-Friendly Approach
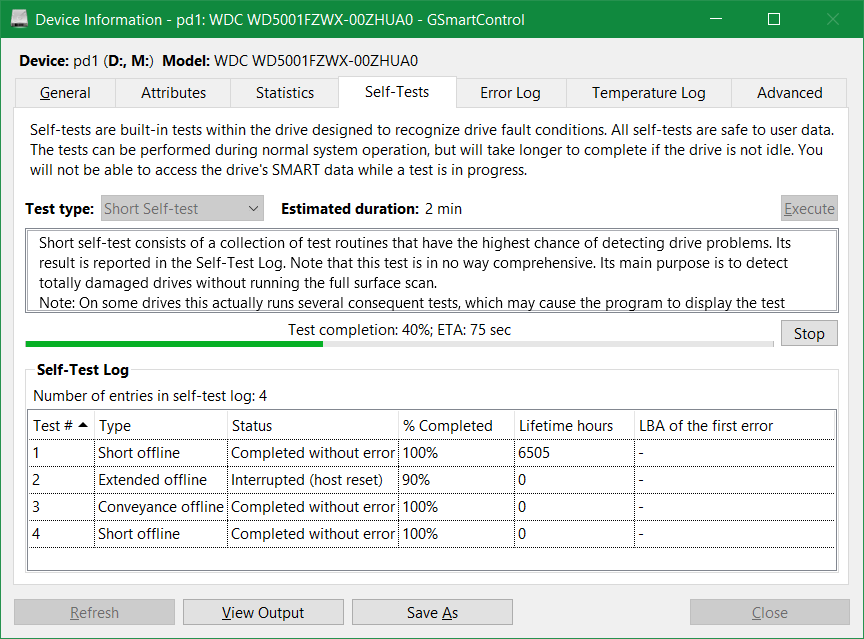
Smartmontools is a powerful command-line utility for monitoring and analyzing the health of storage devices. However, its command-line interface can be intimidating for some users. To address this, a Graphical User Interface (GUI) for Smartmontools provides a user-friendly approach.
The GUI simplifies the process of accessing and interpreting the data provided by Smartmontools. It offers an intuitive interface that allows users to easily view the status, temperature, and other vital statistics of their storage devices. Additionally, it provides graphical representations and notifications for better visualization and understanding.
For instance, instead of executing the command “smartctl -a /dev/sda” in the terminal, users can simply launch the GUI and select the desired device to obtain the same information. The GUI also enables users to schedule automatic tests, set up email notifications, and customize various settings effortlessly.
By providing a GUI for Smartmontools, users with limited command-line experience can benefit from the powerful features of this tool without the need for extensive technical knowledge. It enhances accessibility and usability, making storage device monitoring and maintenance more approachable for a wider range of users.
Smartmontools Email Monitoring: Stay Updated on Your Disk Health
To enable email monitoring, users need to set up their email client and configure Smartmontools accordingly. This involves specifying the email recipient, SMTP server, and authentication details. Once configured, Smartmontools will periodically check the disk’s health status and send email alerts if any problems are detected.

For instance, to configure Smartmontools to send email notifications using Gmail’s SMTP server on Linux, the following command can be used:
sudo smartctl --all /dev/sda -d ata -s on -o on -S on -a -H -l error -l selftest -l selective -M test -M exec /usr/sbin/sendmail -q1m -f smartd@example.com -t
By utilizing Smartmontools’ email monitoring feature, users can proactively address disk issues, prevent data loss, and ensure the longevity of their storage devices.
Testing HDD or SSD Drive with Smartmontools on Linux
To test a drive using Smartmontools, first, ensure it is connected to your Linux system. Then, open a terminal and run the following command:
sudo smartctl -t long /dev/sdX
Replace “sdX” with the appropriate drive identifier (e.g., sda, sdb). This command initiates a long self-test on the drive, which thoroughly checks for any potential issues. You can also use “-t short” for a quicker test. To view the test results, use:
sudo smartctl -a /dev/sdX
This command displays the drive’s SMART attributes, including the test results. Look for the “SMART 🟢 overall-health self-assessment test result” to determine the drive’s health status. Smartmontools is a valuable tool for proactive drive maintenance, allowing you to identify and address potential problems before they escalate.

S.M.A.R.T Monitoring – Other Software for Linux Systems
If you’re looking for alternatives to smartmontools for S.M.A.R.T. monitoring on Linux systems, one option you can consider is the zabbix-smartmontools project available on GitHub. This project offers disk S.M.A.R.T. monitoring for Linux, FreeBSD, and Windows, and it integrates with the Zabbix monitoring software. It is a good choice if you’re already using or considering Zabbix for your monitoring needs.
For a more in-depth understanding of S.M.A.R.T. monitoring in general, including how to interpret various metrics and logs, you might find resources like Linux Handbook and Linux.com useful. These websites provide detailed explanations and tutorials on how to use S.M.A.R.T. tools and understand their output. They cover various aspects of S.M.A.R.T. data, including how to perform health checks, interpret error logs, and run self-tests on your drives.
These software options provide Linux users with convenient ways to monitor the health and performance of their storage devices, helping them detect and prevent potential failures before they occur.
However, it’s important to note that while these tools can provide valuable insights into the health of your drives, they are not foolproof predictors of failure. Regular backups are always recommended as a part of good data management practice.
Can I Fix or Reset the S.M.A.R.T Data of a Failing Drive?
Unfortunately, you cannot fix or reset the S.M.A.R.T (Self-Monitoring, Analysis, and Reporting Technology) data of a failing 🖴 drive. S.M.A.R.T 🟢 is a feature built into hard drives that monitors various attributes such as temperature, error rates, and bad sectors. When a drive starts to fail, S.M.A.R.T will report these issues to the operating system.
While you cannot reset or fix the S.M.A.R.T data, you can use it to assess the health of your drive and take appropriate action. If your drive is failing, it is crucial to back up your data immediately and replace the drive to prevent data loss.
Testing S.M.A.R.T of HDD or SSD on a Windows System

Testing the S.M.A.R.T (Self-Monitoring, Analysis, and Reporting Technology) of HDD or SSD on a Windows system is crucial for identifying potential drive failures. To perform this test, follow these steps:
1. Open the Command Prompt as an administrator.
2. Type wmic diskdrive list brief to list all the connected drives and note down the drive number of the HDD or SSD you want to test.
3. Run the command wmic diskdrive get status followed by the drive number to check the S.M.A.R.T status. A “OK” status indicates the drive is healthy.
4. For a more detailed report, use a third-party software like CrystalDiskInfo or HDDScan. These tools provide comprehensive S.M.A.R.T information and can analyze the drive’s health.
In Linux, you can use the smartctl command to test S.M.A.R.T. For example, smartctl -a /dev/sda will display the S.M.A.R.T attributes of the drive /dev/sda.
How Monitoring Your SSD or HDD with S.M.A.R.T Keeps Your Data Safe
Monitoring your SSD or HDD with S.M.A.R.T (Self-Monitoring, Analysis, and Reporting Technology) is crucial for ensuring the safety of your data. S.M.A.R.T is a feature built into modern storage devices that continuously monitors various parameters related to their health and performance. By regularly checking these metrics, you can detect potential issues before they escalate into catastrophic failures.
S.M.A.R.T provides valuable insights into critical aspects such as temperature, read/write errors, reallocated sectors, and overall lifespan. With this information, you can take proactive measures to prevent data loss by replacing a failing drive or backing up your data in a timely manner.
By monitoring your SSD or HDD with S.M.A.R.T, you can ensure the longevity of your storage devices and safeguard your valuable data.
Conclusion: The Importance of S.M.A.R.T 🟢 Monitoring for Data Safety

In conclusion, S.M.A.R.T (Self-Monitoring, Analysis, and Reporting Technology) monitoring is crucial for ensuring data safety in any system. By continuously monitoring the health and performance of storage devices, S.M.A.R.T provides early warnings about potential failures, allowing users to take preventive measures and avoid data loss.
Implementing S.M.A.R.T monitoring is relatively simple and can be done on various operating systems, including Linux. For instance, the smartctl command can be used to retrieve S.M.A.R.T information from hard drives and solid-state drives. By regularly running this command and analyzing the results, users can identify any signs of deterioration or impending failures.
By proactively monitoring S.M.A.R.T attributes such as temperature, read/write error rates, and reallocated sectors, system administrators can take appropriate actions, such as replacing failing drives or backing up critical data. This preventive approach significantly reduces the risk of unexpected hardware failures and minimizes the potential impact on data integrity.

This article incorporates information and material from various online sources. We acknowledge and appreciate the work of all original authors, publishers, and websites. While every effort has been made to appropriately credit the source material, any unintentional oversight or omission does not constitute a copyright infringement. All trademarks, logos, and images mentioned are the property of their respective owners. If you believe that any content used in this article infringes upon your copyright, please contact us immediately for review and prompt action.
This article is intended for informational and educational purposes only and does not infringe on the rights of the copyright owners. If any copyrighted material has been used without proper credit or in violation of copyright laws, it is unintentional and we will rectify it promptly upon notification. Please note that the republishing, redistribution, or reproduction of part or all of the contents in any form is prohibited without express written permission from the author and website owner. For permissions or further inquiries, please contact us.
More stories