Proxmox VE: The Perfect Virtualization Solution
Are you new to Proxmox and looking for a comprehensive guide to get started? Look no further! In this article, we will explore what Proxmox is and its system requirements. We will also discuss whether to install Proxmox on an SSD or HDD and how to connect to it from a browser. Additionally, we will delve into the virtualization options supported by Proxmox, the file systems it can work with, and the limitations of the free license. Furthermore, we will compare Proxmox with other popular virtualization platforms like VMware and XCP-ng. Stay tuned for useful links and tips for Proxmox users!
Table of Contents
- Understanding Proxmox: An Introduction
- System Requirements for Proxmox
- Installing Proxmox: SSD vs HDD
- Connecting to Proxmox from a Browser
- Virtualization in Proxmox
- Supported File Systems in Proxmox
- Free Proxmox License Limits and Paid Features
- Setting Up a Proxmox Cluster with CEPH or ZFS
- Comparing VMware and Proxmox
- Exploring Alternatives to Proxmox
- Installing Proxmox: ISO vs After Debian Install
- Proxmox vs ESXi: A Comparison
- Proxmox vs XCP-NG (Xen): A Comparison
- Useful Links
Understanding Proxmox: An Introduction
Proxmox is an open-source virtualization platform that combines the power of virtual machines (VMs) and containers, providing a comprehensive solution for managing and deploying applications. 🖥️
With Proxmox, you can easily create and manage VMs and containers, allowing you to run multiple operating systems and applications on a single physical server. It offers a user-friendly web interface, making it accessible even for beginners. 🌐
Key features of Proxmox include:
– Virtualization: Run multiple VMs on a single server.
– Containers: Utilize lightweight containers for efficient resource allocation.
– High Availability: Ensure continuous operation with failover capabilities.
– Backup and Restore: Safeguard your data with built-in backup and restore options.
System Requirements for 🖥️ Proxmox
To run Proxmox, your system must meet certain requirements. Here are the key facts:1. Hardware: Proxmox requires a 64-bit processor with virtualization extensions (Intel VT/AMD-V) and a minimum of 4GB RAM. More RAM is recommended for better performance.
2. Storage: You need sufficient storage space for the Proxmox installation and virtual machines. A minimum of 32GB is recommended, but it depends on your usage.
3. Network: A stable network connection is essential for managing and accessing Proxmox. Ensure your network infrastructure meets your requirements.
4. Operating System: Proxmox is based on Debian, so it is compatible with Debian-based Linux distributions.
To check if your system meets the requirements, you can use the following command in a Linux terminal:
egrep -c '(vmx|svm)' /proc/cpuinfo
This command checks if your CPU supports virtualization extensions. If the output is greater than zero, your CPU is compatible.
In summary, ensure your hardware, storage, network, and operating system meet the specified requirements to run Proxmox smoothly. 🚀
Installing Proxmox: SSD vs HDD
When it comes to installing Proxmox, choosing between SSD and HDD can greatly impact performance and efficiency. 💻
SSD (Solid State Drive): This modern storage technology offers faster data access, reduced latency, and improved overall system responsiveness. Proxmox installation on an SSD can significantly enhance virtual machine performance and reduce boot times. 💨
HDD (Hard Disk Drive): Although HDDs are more affordable and provide larger storage capacities, they are slower compared to SSDs. Proxmox installation on an HDD may result in slower VM performance and longer boot times. ⏳
To install Proxmox on an SSD, follow these steps:
1. Connect the SSD to your system.
2. Install the Proxmox ISO using a bootable USB drive or CD.
3. Select the SSD as the installation destination during the setup process.
Remember to backup any important data before installation. 💾
Example command:
dd if=/path/to/proxmox.iso of=/dev/sdX bs=4M status=progress && sync
Ultimately, choosing between SSD and HDD for Proxmox installation depends on your budget, performance requirements, and storage needs. SSDs offer superior performance, while HDDs provide more cost-effective storage options.
Connecting to Proxmox from a Browser
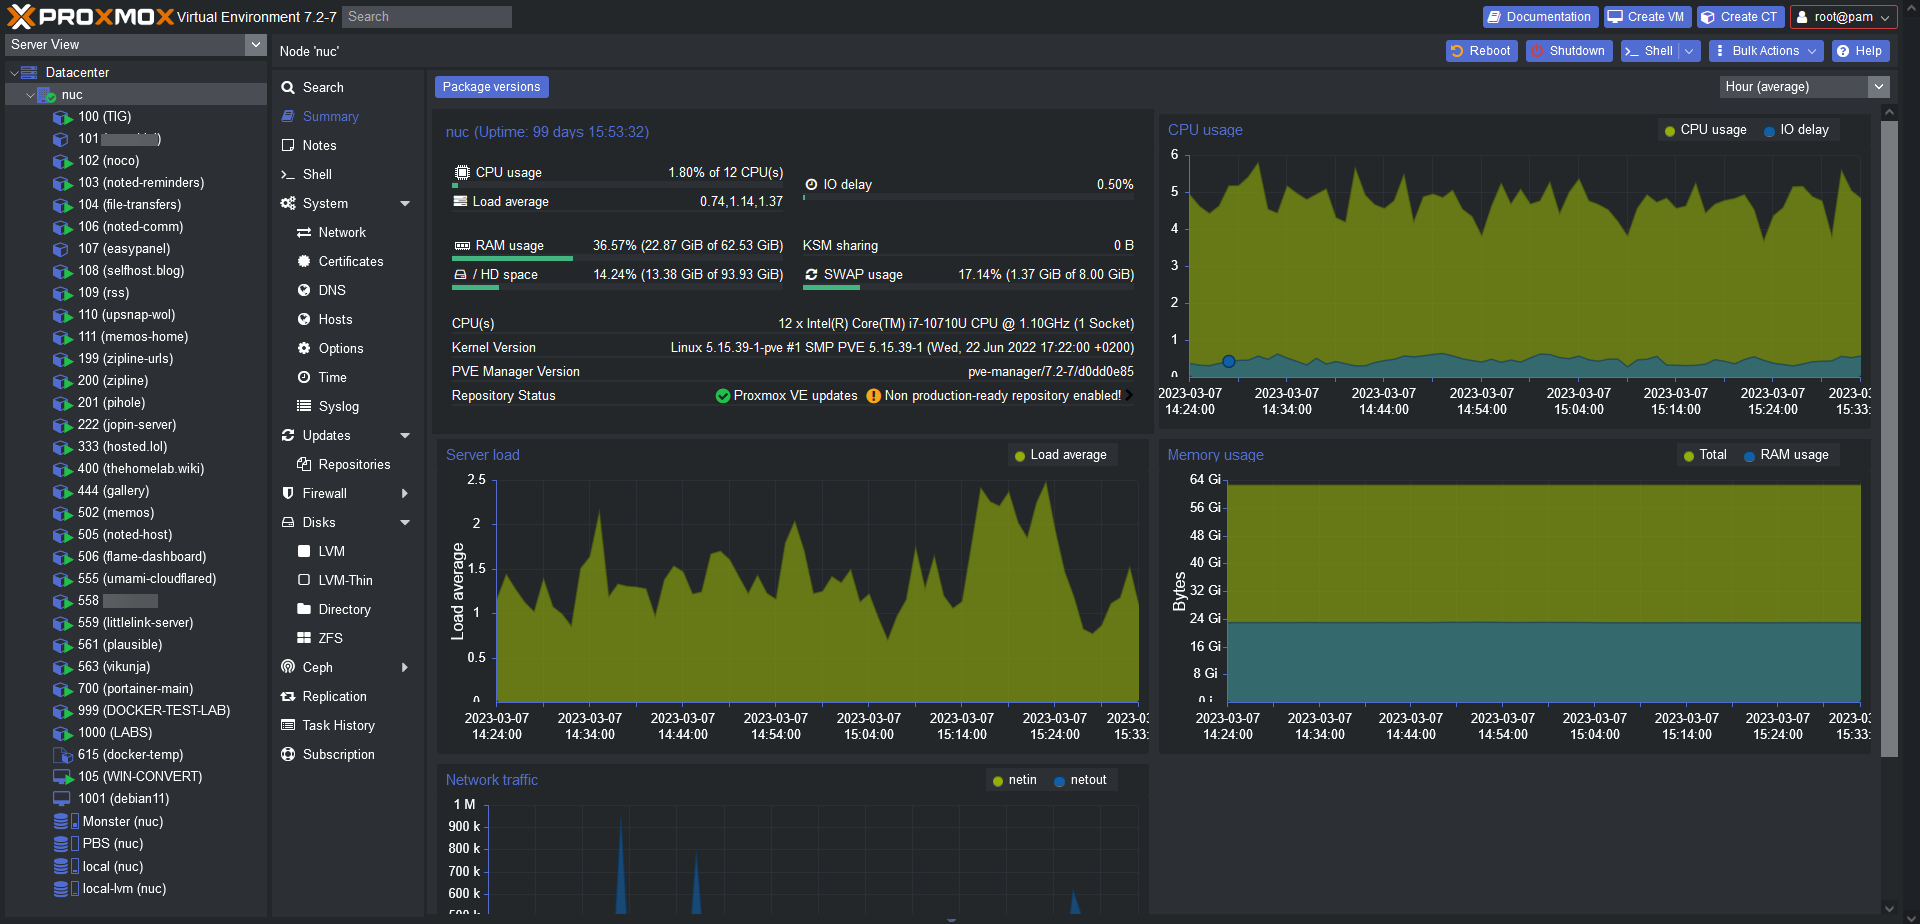
Connecting to Proxmox from a browser provides a convenient and intuitive way to manage your virtualization environment. 🖥️💻 To connect to Proxmox from a browser, you can utilize the Proxmox web interface. 🌐 Simply open your preferred browser and enter the IP address or hostname of your Proxmox server. Ensure that you have a secure connection by using HTTPS. You will be redirected to 8006 port
https://your_proxmoxip:8006:/
Once connected, you will be prompted to enter your Proxmox credentials. 🔒 After successful authentication, you will gain access to the Proxmox dashboard, where you can manage your virtual machines and containers.
Proxmox offers a user-friendly interface with various features, including virtual machine creation, resource allocation, and monitoring. You can also perform tasks like backups, migrations, and network configuration.
To access Proxmox via the command line interface, you can use SSH. Open a terminal and execute the following command: ssh username@proxmox_server_ip. Replace “username” with your Proxmox username and “proxmox_server_ip” with the IP address of your Proxmox server.
Virtualization in Proxmox
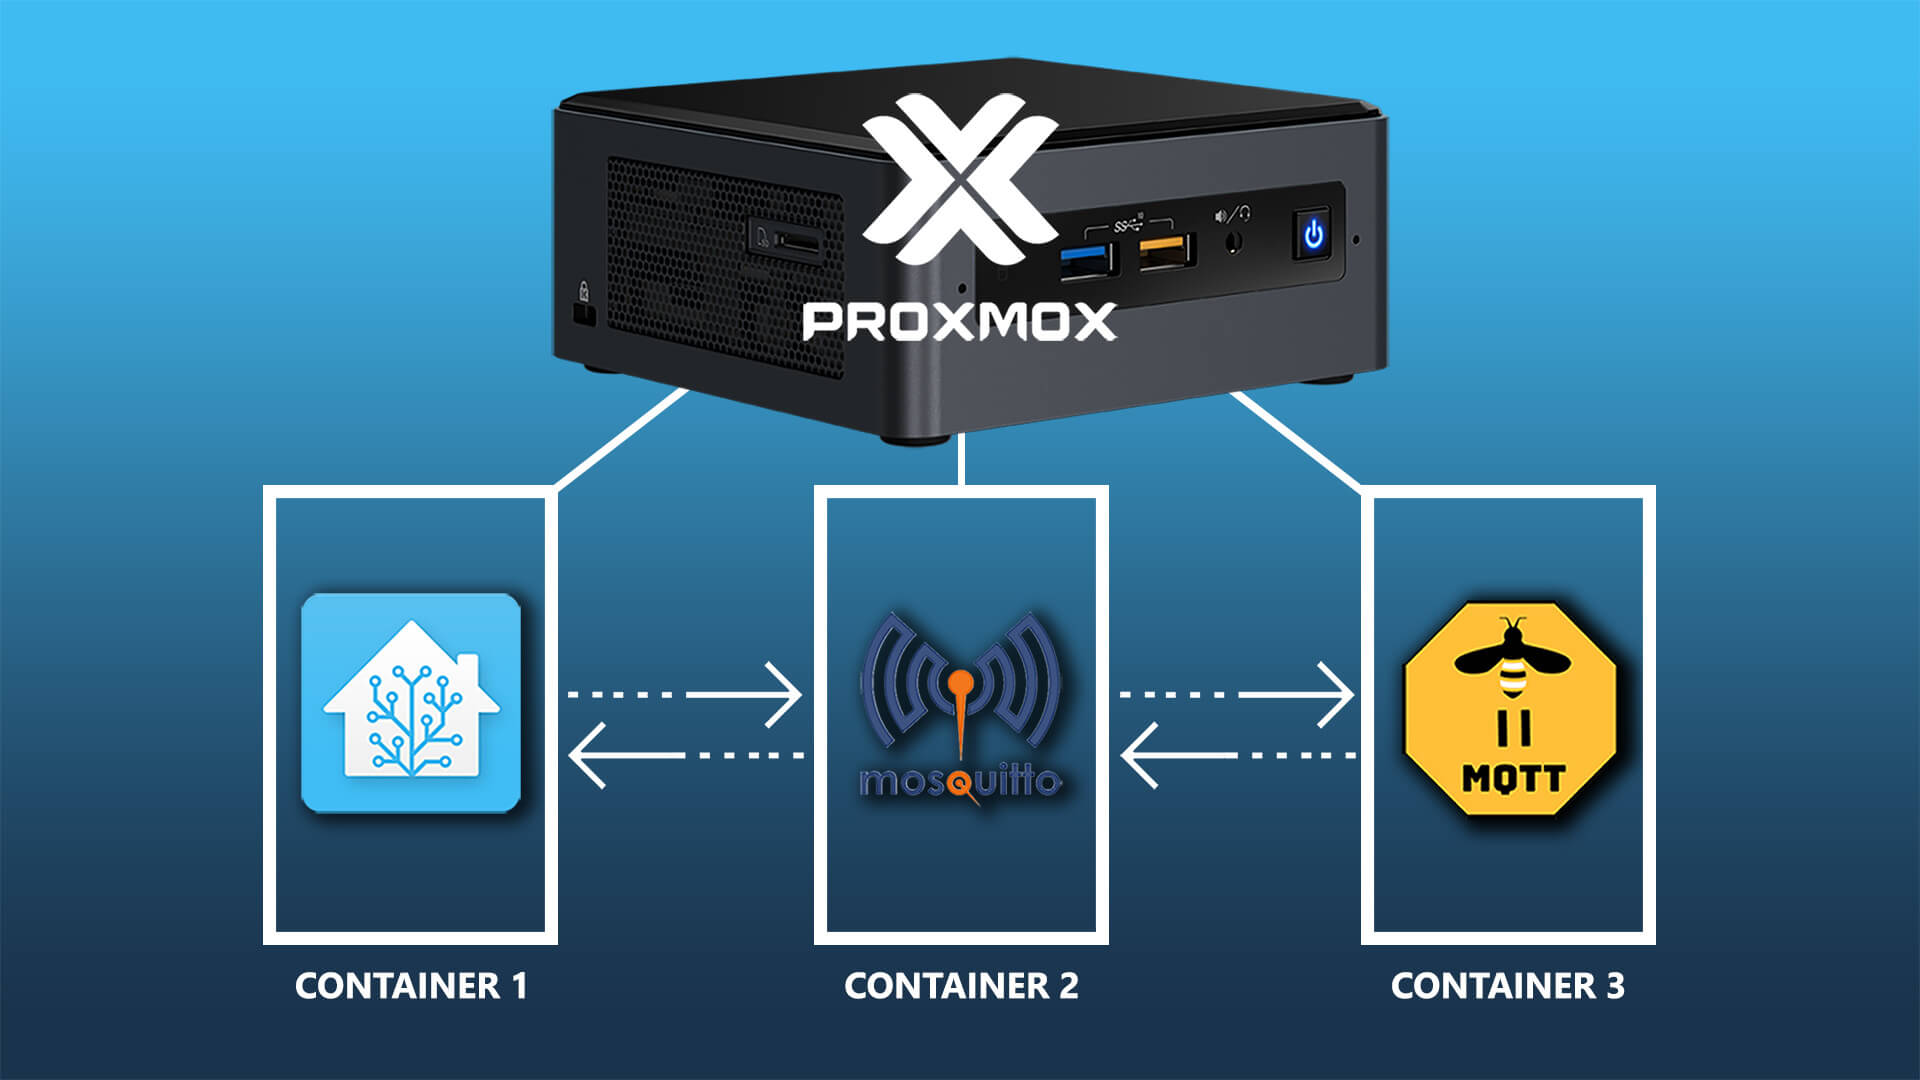
Virtualization in Proxmox 🖥️ is a powerful feature that allows users to create and manage virtual machines (VMs) on a single physical server. Proxmox is an open-source platform that combines the benefits of virtualization and containerization, making it a popular choice for both small businesses and large enterprises.
With Proxmox, you can easily create and manage VMs using a web-based interface. It supports various virtualization technologies such as KVM and LXC, providing flexibility and performance. 🚀
To create a VM in Proxmox, you can use the following Linux command example:
qm create 100 --name myvm --memory 4096 --cores 2 --virtio0 local:10
Proxmox also offers live migration, allowing you to move running VMs between different physical hosts without any downtime. This feature is particularly useful for load balancing and maintenance purposes. ⚙️
Additionally, Proxmox provides a comprehensive backup and restore mechanism, ensuring the safety of your VMs and data. It supports both full and incremental backups, making it easy to recover from any unforeseen events. 💾
In conclusion, Proxmox’s virtualization capabilities, combined with its user-friendly interface and robust features, make it an excellent choice for virtualization needs.
Supported File Systems in Proxmox
Proxmox, a powerful open-source virtualization platform, supports various file systems for storage management. 📁
One of the most commonly used file systems is ext4, which offers excellent performance and reliability. It supports file sizes up to 16 terabytes and can handle up to 4 billion files in a single directory. To create an ext4 file system on a Linux machine, you can use the command: mkfs.ext4 /dev/sdX.
Another popular choice is ZFS, a robust and scalable file system that provides advanced features like data integrity, snapshots, and compression. It is particularly suitable for large-scale storage solutions. To create a ZFS pool on Proxmox, you can use the command: zpool create poolname /dev/sdX.
Proxmox also supports other file systems like XFS, Btrfs, and NFS, each with its own strengths and use cases. It’s important to choose the right file system based on your specific requirements and workload. 💡
In conclusion, Proxmox offers flexibility by supporting multiple file systems, allowing users to optimize storage management according to their needs.
Free Proxmox License Limits and Paid Features
Proxmox is a powerful open-source virtualization platform that offers a free license with certain limitations. 🆓 The free Proxmox license allows you to use the software without any time restrictions, making it ideal for personal or small-scale deployments. It supports an unlimited number of CPU sockets and cores, making it suitable for most home or small business setups. However, the free license is limited to a maximum of two physical CPU sockets per server.
For those requiring additional features and support, Proxmox offers a paid subscription called Proxmox VE Subscription. 💰 This subscription provides access to enterprise-grade features such as high availability clustering, backup, and restore options, as well as professional support. With the subscription, you can also benefit from regular updates and security patches.
To check the number of CPU sockets on your Proxmox server, you can use the following Linux command: lscpu. This will display detailed information about your CPU configuration, including the number of sockets.
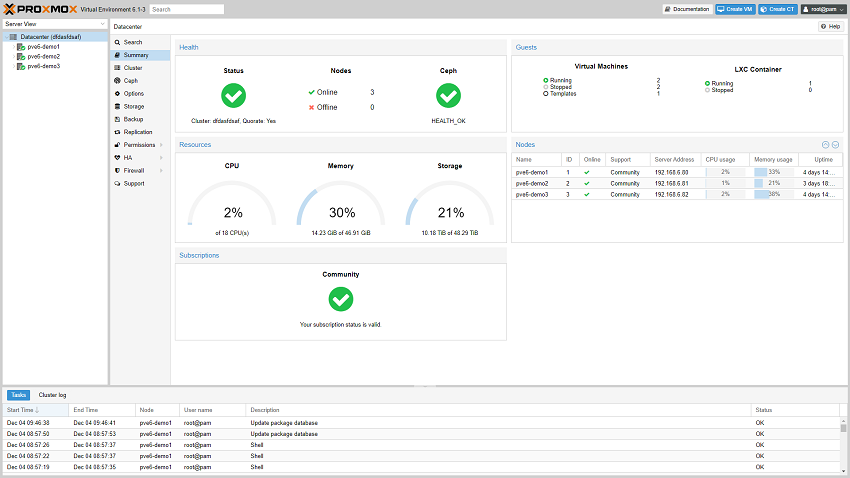
Setting Up a Proxmox Cluster with CEPH or ZFS
Setting up a Proxmox cluster with CEPH or ZFS is a powerful way to enhance your virtualization environment. 🖥️ Proxmox provides a user-friendly interface for managing virtual machines and containers, while CEPH and ZFS offer robust storage solutions.
🔧 To set up a Proxmox cluster with CEPH, you need to configure CEPH storage on each node and create a CEPH pool. Proxmox will then recognize the CEPH storage and allow you to use it for your virtual machines.
🔒 On the other hand, if you prefer ZFS, you can create a ZFS pool on each node and configure Proxmox to use it as the storage backend. ZFS provides advanced features like data integrity, compression, and snapshots.
💻 To illustrate, here’s an example of creating a CEPH pool using the command line:
ceph osd pool create mypool 128 128
📚 Whether you choose CEPH or ZFS, setting up a Proxmox cluster with these storage options will greatly enhance your virtualization capabilities and ensure reliable data storage.
Comparing VMware and Proxmox
When it comes to virtualization platforms, two popular options are VMware and Proxmox. 🏢
VMware is a well-established player in the market, offering a comprehensive suite of virtualization solutions. It provides a range of features such as high availability, live migration, and centralized management through vCenter. 🌐
On the other hand, Proxmox is an open-source alternative that combines virtualization and containerization. It supports both KVM and LXC, allowing users to run virtual machines and containers simultaneously. Proxmox also offers a web-based interface for easy management. 🐧
While VMware is known for its robustness and enterprise-level support, Proxmox appeals to those seeking a cost-effective solution without compromising functionality. Additionally, Proxmox’s open-source nature allows for community-driven development and customization. 🌟
Here’s an example of a Linux command to create a virtual machine in Proxmox using KVM:
qm create 100 --name myvm --memory 4096 --net0 virtio,bridge=vmbr0 --virtio0 local:10,format=qcow2
Ultimately, the choice between VMware and Proxmox depends on your specific needs and budget. Both platforms have their strengths and can provide efficient virtualization solutions. 🤝
Exploring Alternatives to Proxmox
Proxmox is a popular open-source virtualization management platform, but there are other options worth considering. One alternative is oVirt, a powerful solution backed by Red Hat. It offers similar features to Proxmox, including live migration and high availability. To install oVirt on a Linux server, use the following commands:
sudo yum install ovirt-engine

sudo engine-setup
Another option is Virtualizor, a commercial virtualization platform with a user-friendly interface. It supports various virtualization technologies and provides advanced features like automated backups and resource management. To install Virtualizor, follow their installation guide.
For those seeking a lightweight solution, Kimchi is a great choice. It is a web-based management tool for KVM virtualization, offering a simple and intuitive interface. To install Kimchi on Ubuntu, use the following commands:
sudo apt-get install kimchi

sudo kimchi-ctl start
Exploring these alternatives can help you find the virtualization platform that best suits your needs and preferences. 🖥️
Installing Proxmox: ISO vs After Debian Install
Installing Proxmox can be done in two ways: using the ISO or after a Debian installation. 🖥️
ISO installation: This method involves downloading the Proxmox VE ISO image and creating a bootable USB drive or burning it to a DVD. Booting from the media allows you to install Proxmox directly on your hardware. This is a straightforward process and suitable for new installations.
After Debian installation: If you already have a Debian system running, you can install Proxmox on top of it. This method is useful when you want to add Proxmox to an existing server or virtual machine. It involves adding the Proxmox repository to Debian and installing the necessary packages.
Both methods have their advantages, so choose the one that suits your needs. Remember to backup your data before proceeding with any installation.
Example command:
apt-get install proxmox-ve
Proxmox vs ESXi: A Comparison 🔄
Proxmox and ESXi are popular virtualization platforms, each with its own strengths and use cases. Proxmox, an open-source solution, offers a comprehensive feature set, including container-based virtualization (LXC) and full virtualization (KVM). It supports both Linux and Windows guests, making it versatile. With Proxmox, you can manage your virtual machines (VMs) through a web-based interface, making it user-friendly.
On the other hand, ESXi, developed by VMware, is a robust and widely-used virtualization platform. It provides advanced features like vMotion and High Availability, making it ideal for enterprise environments. ESXi offers excellent performance and scalability, ensuring efficient resource utilization. It also provides a centralized management interface, vSphere, for easy VM administration.
To install Proxmox, use the following apt command:
apt install proxmox-ve
For ESXi, you need to download the ISO file from VMware’s website and follow the installation wizard.
Ultimately, the choice between Proxmox and ESXi depends on your specific requirements and preferences. Both platforms offer powerful virtualization capabilities, so consider your needs and evaluate which one aligns better with your goals.
Proxmox vs XCP-NG (Xen): A Comparison
Proxmox and XCP-NG (Xen) are both popular open-source virtualization platforms, each with its own strengths and features. 🚀
Proxmox, based on Debian, offers a user-friendly web interface and supports both container-based virtualization (LXC) and full virtualization (KVM). It provides a wide range of features like live migration, high availability, and backup/restore options. Proxmox also supports ZFS storage, which offers advanced data protection and management capabilities. Proxmox commands: pveperf, pvecm, pvesh.
XCP-NG, based on Xen, focuses on performance and scalability. It offers a centralized management console and supports live migration, high availability, and disaster recovery. XCP-NG also provides advanced networking features like VLANs and SR-IOV. XCP-NG commands: xe, xenstore, xenops.
Both platforms have active communities and offer commercial support options. The choice between Proxmox and XCP-NG depends on specific requirements and preferences. Proxmox is known for its ease of use and comprehensive feature set, while XCP-NG excels in performance and scalability. 🤝
Overall, both Proxmox and XCP-NG are robust virtualization solutions, and the decision should be based on individual needs and priorities.
Useful Links
Download Proxmox ISO: https://www.proxmox.com/en/downloads
Community Forum : https://forum.proxmox.com/
Conclusion
In conclusion, The Proxmox is a better way for newbies, beginners to start work with containers, virtual machines, etc.. With its comprehensive coverage of key concepts and step-by-step tutorials, it empowers users to harness the full potential of this powerful virtualization platform. 📚💪 Whether you’re a sysadmin or a developer, this guide will equip you with the knowledge and skills needed to confidently navigate and optimize your Proxmox environment🚀

This article incorporates information and material from various online sources. We acknowledge and appreciate the work of all original authors, publishers, and websites. While every effort has been made to appropriately credit the source material, any unintentional oversight or omission does not constitute a copyright infringement. All trademarks, logos, and images mentioned are the property of their respective owners. If you believe that any content used in this article infringes upon your copyright, please contact us immediately for review and prompt action.
This article is intended for informational and educational purposes only and does not infringe on the rights of the copyright owners. If any copyrighted material has been used without proper credit or in violation of copyright laws, it is unintentional and we will rectify it promptly upon notification. Please note that the republishing, redistribution, or reproduction of part or all of the contents in any form is prohibited without express written permission from the author and website owner. For permissions or further inquiries, please contact us.
More stories